Trước đây để tạo hiệu ứng chuyển màu như thế này , chúng ta cần phải chuẩn bị 2 tấm hình, một có màu đen trắng và một có màu nguyên thủy. Nhưng giờ đây, với sự xuất hiện của HTML5 canvas, bạn có thể nhân bản ảnh gốc và tạo ra một ảnh đen trắng trực tiếp một cách đơn giản và nhanh chóng. Mình hy vọng với bài viết này ,sẽ giúp các bạn có thêm một hiệu ứng nhỏ cho các thiết kế web cho mình như portfolio showcase, photo gallery….

Đầu tiên chúng ta sẽ cần có bộ khung html cho hiệu ứng của mình
<div id="pagewrap"> <h1>HTML5 & jQuery Grayscale Demo</h1> <div class="item first"> <a href="http://themify.me"><img src="images/themify.jpg"></a> <h3>Themify</h3> </div> <div class="item"> <a href="http://icondock.com"><img src="images/icondock.jpg"></a> <h3>IconDock</h3> </div> <div class="item"> <a href="http://www.webdesignerwall.com"><img src="images/webdesignerwall.jpg"></a> <h3>Web Designer Wall</h3> </div> <div class="item first"> <a href="#"><img src="images/koifish.jpg"></a> <h3>Koi</h3> </div> <div class="item"> <a href="#"><img src="images/phoenix.jpg"></a> <h3>Phoenix</h3> </div> <div class="item"> <a href="#"><img src="images/peacock.jpg"></a> <h3>Peacock</h3> </div> <div class="item first"> <a href="#"><img src="images/flow.jpg"></a> <h3>Flow</h3> </div> <div class="item"> <a href="#"><img src="images/webdesign136cover.jpg"></a> <h3>Web Designer</h3> </div> <div class="item"> <a href="#"><img src="images/sakura.jpg"></a> <h3>Sakura</h3> </div> </div>
Hình ảnh trong đoạn html trên các bạn có thể thay thế bằng ảnh của các bạn hoặc có thể download trực tiếp trên trang demo.
Kế tiếp , chúng ta sẽ chèn đoạn script sau để tạo hiệu ứng :
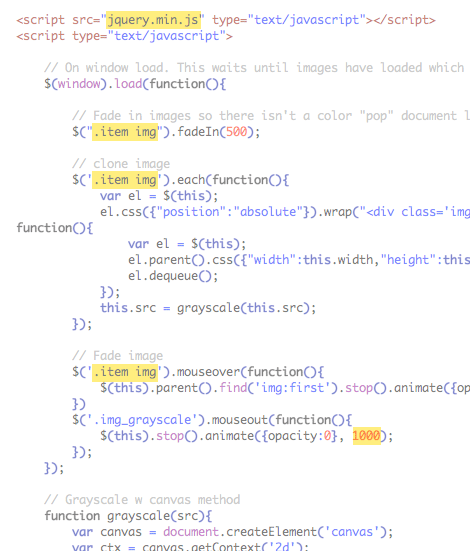
<script src="jquery.min.js" type="text/javascript"></script>
<script type="text/javascript">

	// On window load. This waits until images have loaded which is essential
	$(window).load(function(){

		// Fade in images so there isn't a color "pop" document load and then on window load
		$(".item img").fadeIn(500);

		// clone image
		$('.item img').each(function(){
			var el = $(this);
			el.css({"position":"absolute"}).wrap("<div class='img_wrapper' style='display: inline-block'>").clone().addClass('img_grayscale').css({"position":"absolute","z-index":"998","opacity":"0"}).insertBefore(el).queue(function(){
				var el = $(this);
				el.parent().css({"width":this.width,"height":this.height});
				el.dequeue();
			});
			this.src = grayscale(this.src);
		});

		// Fade image
		$('.item img').mouseover(function(){
			$(this).parent().find('img:first').stop().animate({opacity:1}, 1000);
		})
		$('.img_grayscale').mouseout(function(){
			$(this).stop().animate({opacity:0}, 1000);
		});
	});

	// Grayscale w canvas method
	function grayscale(src){
		var canvas = document.createElement('canvas');
		var ctx = canvas.getContext('2d');
		var imgObj = new Image();
		imgObj.src = src;
		canvas.width = imgObj.width;
		canvas.height = imgObj.height;
		ctx.drawImage(imgObj, 0, 0);
		var imgPixels = ctx.getImageData(0, 0, canvas.width, canvas.height);
		for(var y = 0; y < imgPixels.height; y++){
			for(var x = 0; x < imgPixels.width; x++){
				var i = (y * 4) * imgPixels.width + x * 4;
				var avg = (imgPixels.data[i] + imgPixels.data[i + 1] + imgPixels.data[i + 2]) / 3;
				imgPixels.data[i] = avg;
				imgPixels.data[i + 1] = avg;
				imgPixels.data[i + 2] = avg;
			}
		}
		ctx.putImageData(imgPixels, 0, 0, 0, 0, imgPixels.width, imgPixels.height);
		return canvas.toDataURL();
    }

</script>
Cách sử dụng cho trang của bạn:
– Sửa lại đường dẫn đến jquery.min.js (cái được tô màu vàng)
– Sửa lại các thẻ trước file hình cho phù hợp với trang của bạn. (vd: .post-img, img, .gallery img, ….)
– Bạn có thể thay đổi tốc độ hiệu ứng (1000 = 1 giây)

Nếu bạn nào có gì chưa rõ trong quá trình tạo hiệu ứng thì có thể để lại lời nhắn dưới dạng comments, mình sẽ giúp các bạn hoàn thành bài viết này.
Chúc các bạn thành công !
Chuyên Mục: HTML5
Bài viết được đăng bởi webmaster


