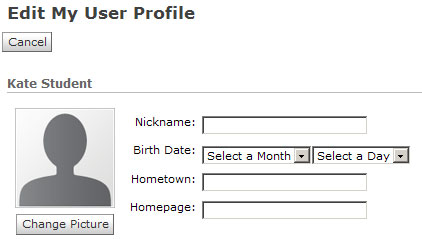
Nếu bạn đang làm một trang web có chức năng quản lý thành viên , thì ắt hẳn là các bạn sẽ muốn tạo bên ngoài font end có chức năng cho phép thành viên tự chỉnh sửa thông tin của họ mà không cần phải đăng nhập vào trang admin.

Các bạn có thể dễ dàng tạo trang chỉnh sửa thông tin thành viên này rất đơn giản. Chỉ việc copy file page.php (nằm tại folder tên theme các bạn đang dùng). Sau đó past ngay tại folder theme, lúc này chúng ta sẽ có một file mới là bản copy của file page.php. Sửa lại tên file mới này là page-profile.php (các bạn có thể đổi theo tên mà các bạn muốn).
Mở file page-profile.php ra, sau đó copy đoạn code sau và dán nó vào vị trí đầu tiên trong file :
<?php
/**
 * Template Name: User Profile
 *
 * Allow users to update their profiles from Frontend.
 *
 */

/* Get user info. */
global $current_user, $wp_roles;
get_currentuserinfo();

/* Load the registration file. */
require_once( ABSPATH . WPINC . '/registration.php' );
$error = array();
/* If profile was saved, update profile. */
if ( 'POST' == $_SERVER['REQUEST_METHOD'] && !empty( $_POST['action'] ) && $_POST['action'] == 'update-user' ) {

    /* Update user password. */
    if ( !empty($_POST['pass1'] ) && !empty( $_POST['pass2'] ) ) {
        if ( $_POST['pass1'] == $_POST['pass2'] )
            wp_update_user( array( 'ID' => $current_user->ID, 'user_pass' => esc_attr( $_POST['pass1'] ) ) );
        else
            $error[] = __('The passwords you entered do not match.  Your password was not updated.', 'profile');
    }

    /* Update user information. */
    if ( !empty( $_POST['url'] ) )
        update_user_meta( $current_user->ID, 'user_url', esc_url( $_POST['url'] ) );
    if ( !empty( $_POST['email'] ) ){
        if (!is_email(esc_attr( $_POST['email'] )))
            $error[] = __('The Email you entered is not valid.  please try again.', 'profile');
        elseif(email_exists(esc_attr( $_POST['email'] )) != $current_user->id )
            $error[] = __('This email is already used by another user.  try a different one.', 'profile');
        else{
            wp_update_user( array ('ID' => $current_user->ID, 'user_email' => esc_attr( $_POST['email'] )));
        }
    }

    if ( !empty( $_POST['first-name'] ) )
        update_user_meta( $current_user->ID, 'first_name', esc_attr( $_POST['first-name'] ) );
    if ( !empty( $_POST['last-name'] ) )
        update_user_meta($current_user->ID, 'last_name', esc_attr( $_POST['last-name'] ) );
    if ( !empty( $_POST['description'] ) )
        update_user_meta( $current_user->ID, 'description', esc_attr( $_POST['description'] ) );

    /* Redirect so the page will show updated info.*/
  /*I am not Author of this Code- i dont know why but it worked for me after changing below line to if ( count($error) == 0 ){ */
    if ( count($error) == 0 ) {
        //action hook for plugins and extra fields saving
        do_action('edit_user_profile_update', $current_user->ID);
        wp_redirect( get_permalink() );
        exit;
    }
}
?>
Sau đó thay thế vòng lặp (the loop) bằng đoạn code sau :
<?php if ( have_posts() ) : while ( have_posts() ) : the_post(); ?>
    <div id="post-<?php the_ID(); ?>">
        <div class="entry-content entry">
            <?php the_content(); ?>
            <?php if ( !is_user_logged_in() ) : ?>
                    <p class="warning">
                        <?php _e('You must be logged in to edit your profile.', 'profile'); ?>
                    </p><!-- .warning -->
            <?php else : ?>
                <?php if ( count($error) > 0 ) echo '<p class="error">' . implode("<br />", $error) . '</p>'; ?>
                <form method="post" id="adduser" action="<?php the_permalink(); ?>">
                    <p class="form-username">
                        <label for="first-name"><?php _e('First Name', 'profile'); ?></label>
                        <input class="text-input" name="first-name" type="text" id="first-name" value="<?php the_author_meta( 'first_name', $current_user->ID ); ?>" />
                    </p><!-- .form-username -->
                    <p class="form-username">
                        <label for="last-name"><?php _e('Last Name', 'profile'); ?></label>
                        <input class="text-input" name="last-name" type="text" id="last-name" value="<?php the_author_meta( 'last_name', $current_user->ID ); ?>" />
                    </p><!-- .form-username -->
                    <p class="form-email">
                        <label for="email"><?php _e('E-mail *', 'profile'); ?></label>
                        <input class="text-input" name="email" type="text" id="email" value="<?php the_author_meta( 'user_email', $current_user->ID ); ?>" />
                    </p><!-- .form-email -->
                    <p class="form-url">
                        <label for="url"><?php _e('Website', 'profile'); ?></label>
                        <input class="text-input" name="url" type="text" id="url" value="<?php the_author_meta( 'user_url', $current_user->ID ); ?>" />
                    </p><!-- .form-url -->
                    <p class="form-password">
                        <label for="pass1"><?php _e('Password *', 'profile'); ?> </label>
                        <input class="text-input" name="pass1" type="password" id="pass1" />
                    </p><!-- .form-password -->
                    <p class="form-password">
                        <label for="pass2"><?php _e('Repeat Password *', 'profile'); ?></label>
                        <input class="text-input" name="pass2" type="password" id="pass2" />
                    </p><!-- .form-password -->
                    <p class="form-textarea">
                        <label for="description"><?php _e('Biographical Information', 'profile') ?></label>
                        <textarea name="description" id="description" rows="3" cols="50"><?php the_author_meta( 'description', $current_user->ID ); ?></textarea>
                    </p><!-- .form-textarea -->

                    <?php
                        //action hook for plugin and extra fields
                        do_action('edit_user_profile',$current_user);
                    ?>
                    <p class="form-submit">
                        <?php echo $referer; ?>
                        <input name="updateuser" type="submit" id="updateuser" class="submit button" value="<?php _e('Update', 'profile'); ?>" />
                        <?php wp_nonce_field( 'update-user' ) ?>
                        <input name="action" type="hidden" id="action" value="update-user" />
                    </p><!-- .form-submit -->
                </form><!-- #adduser -->
            <?php endif; ?>
        </div><!-- .entry-content -->
    </div><!-- .hentry .post -->
    <?php endwhile; ?>
<?php else: ?>
    <p class="no-data">
        <?php _e('Sorry, no page matched your criteria.', 'profile'); ?>
    </p><!-- .no-data -->
<?php endif; ?>
Bây giờ các bạn vào trang admin, tạo một page mới , rồi từ danh sách Template ở mục Page Attributes rồi chọn tên “User Profile ” rồi nhấn Publish để hoàn tất.
Đó là tất cả những gì các bạn cần làm để có một trang Edit User Profile, ngoài ra các bạn còn có thể chèn thêm các filed khác như địa chỉ, số phone, giới tính… cho các thành viên bằng cách thêm các trường này vào form giống như những fields đã có.
Nếu có gì thắc mắc thì đừng ngần ngại để lại lời nhắn dưới dạng comments nhé, mình sẽ giúp các bạn hoàn thành bài viết này.
Chúc các bạn thành công !
Chuyên Mục: WordPress
Bài viết được đăng bởi webmaster


